Shooting Volcano


You will need:

  • 2 liquid dishwashing detergent bottles, one with cap
  • Tablespoon
  • Red food coloring
  • Vinegar
  • Baking soda
  • Papier-mache
  • Stiff cardboard or piece of wood
  • Masking tape
  • Brown and black paint
  • Paintbrush
  • Spray varnish
  • White glue
  • Funnel

A fiery, lava-spilling volcano is one of the most beutiful and terrifying sights in nature, and scientists who visit active volcanoes sometimes find themselves in great danger. This volcano model will allow you to sample some of the magic of volcanoes-safety at home.

Part-1 : Shooting-Volcano Construction

Procedure :

  1. Fill one of the bottles three-fourth full of vinegar. Use a funnel if necessary. Add red food coloring, and put the cap on the bottle. Lable the bottle "lava"
  2. Place the second bottle in the center of the cardboard or wood, attaching it with a little white glue.
  3. Tear the masking tape into strips, and attach the strips so that you make a kind of tent around the bottle.
  4. Make papier-mache by mixing flour and water in a bowl into a thick paste. Dip newspaper strips into the paste, and cover the tent you made around the bottle with the paste-coated newspaper. Built a little papier-mache up around the lip of the bottle so that you form a crater.
  5. Allow your volcano model to dry. Paint it brown and black to look like a mountain, and coat it with spray varnish.

Part-2 : Shooting Volcano Eruption

Procedure :

Remove the cap of the "lava" bottle, and carefully pour the "lava" into the volcano bottle, using a funnel if necessary.

Quickly add 4 tablespoons (60 ml) of baking soda.

Stand back and watch your volcano erupt.

Result :

The alkaline baking soda reacts with the acid vinegar to produce carbon-dioxide foam. As the foam rises to the narrowing top of the jar, it gains momentum and shoots out to fill the crater of the volcano.

Explanation :

The procedure inside a volcano can either result in a tremendous explosion or in plumes of lava that shoot far out into the air. The behavior of the foam in your miniature volcano simulated the pressure of ejecting lava.

Display Tip :

It's better to take photographs of your erupting volcano rather than to demonstrate it in your booth. You should certainly display your impressive model, however.

Did You Know?

The pressure of molten-lava gases that builds up inside a volcano can equal the force of several atomic explosions.

Millions years ago, a volcano in the northwestern United States blew the top off an entire mountain. The result was a gigantic crater, called a caldera, that gradually filled up with water. Today, the extinct volcano and transformed mountain is known as Crater Lake. In the state of Oregon, Crater Lake attracts thousands of tourist each year. Crater Lake is over 5 miles across. It is one of the deepest lakes in the world and one of the highest, too

Source : Science Fair Project by Glen Vecchione

Ant Architecture


This project lets you observe the elaborate tunneling structures of an ant colony and determine the social organization of ants.


You will need

2 wide-mouth glass jars
Frozen-orange-juice can or similar can
Small dish
Fine cloth netting
Rubber band
Digging spade
White paper
Soil sample with ants
Gardening gloves
Small block of wood
Pie tin
Black construction paper
Cellophane tape


Procedure

  • Collect workers ants by using the digging spade to gently lift soil under flat rocks. Place the soil sample on the white paper and gently stir it. As the ants scatter, fold the paper and brush both soil and ants into the jar. Replace the jar lid without screwing it on.

Caution : Use gardening gloves when collecting ants. Some species bite.

  • Continue digging until you see ants scattering with larvae. Take one final clump of soil and place it on the white paper. As you gently break it up, you should see the much larger and paler ant queen emerge. If she doesn't appear, take another soil sample and repeat the procedure.
  • Deposit the queen in the jar and screw the lid on. Take the jar to where you'll set up your colony.
  • Place the frozen-orange-juice can in the center of jar #2. Remove the lid from jar #1 and use tablespoon to transfer the soil and ants jar #2. Be extra careful that you don't harm any ants, particularly the queen, during this procedure.
  • When you've surrounded the orange can with ants and soil, rest a small water-filled dish on top of the can. Place netting over the mouth of the jar and secure it with the rubber band.
  • Partly fill the pie tin with water, and place the block of wood in the center.
  • Rest the ant-colony jar on the block of wood so that the water in the pie tin forms a kind of moat around the jar. This will keep ants clever to squeeze through the netting from escaping.
  • Make a wide tube of black construction paper to fit snugly over the jar. Place the tube over the jar, and leave your ants undisturbed in a warm location for 24 hours.
  • Remove the tube to watch the ants; add bits of bread occasionally to feed your colony.

Result

The ants construct an elaborate connecting network tunnels close to the inner surface of the jar. Some tunnels appear to end in small chambers where larvae are kept.

Explanation

Calmed by the presence of their queen and no longer feeling threatened, your ants waste no time in setting up house. Ant colonies have an elaborate structure of tunnels, chambers, nurseries for larvae, and even "gardens" of nutritious molds. As your colony develops, so will the complexity of the tunneling system. You may even notice an ant "cemetery" after a while! The social order of ant colonies usually include three classes: winged, fertile females; wingless infertile females, or workers; and winged males. In some species, workers may become soldiers or other specialized types.

Without the black construction paper, the ants would tunnel towards the jar's interior rather than close to its surface.

Display Tip

Document your ant collecting with photographs. Display the living colony in your booth. Use Post-It notes attached to your jar to identify some of the colony structures, such as tunnels, chambers, or nurseries. If you're lucky enough to have the queen exposed, clearly identify her.

Did You Know?

Not all ants live in tunnels. Some species of ants live in mounds they build above the ground, and other species live in wood. Army ants are mostly on the move, traveling in columns and destroying plants and animals in their way. When they do stop briefly, they live in tangled and structures made of their own bodies.

Source : Science Fair Projects by Glen Vecchione

Homemade Perfume


Besides enhancing the flavors of foods, chemistry can please our sense of smell, too. For thousands of years, people have collected the aromatic oils of plants and seeds in order to make sweet-smelling waters and perfumes. But they had to squeeze a great numbers of to get just a few drops of oil, and scent of the oil did not last very long.

Perfume making is probably one of the oldest forms of chemistry. Perfume makers soon realized that, by adding other ingredients to a plant's essential oils, not only could less oil be used, but the essential oil's scent would last longer.


You will need:

* 7 small jars or vials with lids
* Rubbing alcohol
* Popsicle stick
* Cotton swab
* Tweezers
* Paper towel
* 1/8 cup sample of each : fragrant rose petals, gardenia blossoms, orange-tree (or lemon-tree) leaves, eucalyptus leaves, pine needles, mint leaves, and whole cloves
* Tape or marking pen for labeling


Procedure
  1. Press as many plant and flower samples into 1/8 cup (30 ml) as you can. Place each sample in its own jar.
  2. Except for the cloves, crush the samples as finely as you can with the Popsicle stick.
  3. Add 2 teaspoons (10 ml) of rubbing alcohol and continue crushing.
  4. Add about 10 cloves to one of the jars and then add alcohol.
  5. Puts lids on all the jars, and allow them to sit on a warm place for about a week.
  6. After a week, open one of the jars and dip in the cotton swab. Lift the swab towards your face, and fan the air around the moist tip so that the odor reaches your nose.
  7. Dab the moist tip against the back of your wrist, then allow the spot to dry. Smell it.
  8. Use the tweezers to remove a sample of the plant material, and let it dry on the paper towel. Smell it.

Result

The moist swab had a strong alcohol scent mixed with the plant scent. After you allowed the liquid to dry on your skin, your skin had only the plant scent and no alcohol odor. The sample of dried plant has little or no scent.


Explanation

Alcohol dissolves the aromatic oils in plants so that the plant's oil are removed from the plant tissue, suspended in the alcohol, and preserved. Alcohol also evaporates very quickly when exposed to air. When you placed a sample of homemade perfume on your wrist and exposed it to the air, the alcohol dried quickly, leaving behind only the aromatic oil.


Display Tip

Document each stages of your perfume-making procedure with photograph. Place the actual jars of perfume on your display table, along with some clean cotton swabs so that your perfumes may be sampled. You can also dab a small amount of perfume on separate index cards and label them. Place a sample or picture of each type of plant you've used to create your perfumes.

Did You Know?

About hundred years ago, perfume manufacturers used a secret ingredients as a fixative to keep the scent from evaporating too quickly. The ingredient, ambergris, is a waxy liquid that coats the stomachs of sperm whales and protects the whales fro the sharp bones of cuttlefish. Ambergris has the strange property of turning into a solid as soon as it is removed from the whale and exposed to air, and early photographs of whale hunters show them covered with icicles of ambergris as they packed the stuff into pails for transporting. Luckily, no one uses ambergris anymore due to the chemical substitutes, and the needless killing of whales has almost stopped.

Source : Science Fair Projects by Glen Vecchione

Electroscope

You will need :

Small glass jar
Wire coat hanger
Aluminum foil
Cardboard
Strip of silver Mylar from helium balloon or wrapping paper
Plastic comb
Balloon
Pencil
Cellophane
Rubber cement
Electrical tape
Wire clippers
Pliers


An electroscope is a simple device that measures static electricity, or the freely flowing electrical charges of the atmosphere. Static electricity is caused by friction, or something rubbing against something else. This electricity-producing friction can be as harmless as a comb rubbing against hair or powerful as ice crystals rubbing against each other in a thundercloud.


Procedure :

1. Use the wire clippers to cut off a straight piece of wire from the hanger. Use the pliers to bend a section at one end into L shape.
2. Turn the jar upside down onto the cardboard, and trace a circle around the opening.
3. Cut out the circle and punch a small hole in its center with a pencil.
4. Carefully push the wire through the hole about 1 inch (2.5 cm), straight end first.
5. With as little cellophane tape as possible, attach the middle of the Mylar strip to be bent end of the wire so that the strip hangs down in two equal halves.
6. Rubber cement the cardboard circle to the top of the jar, with the bent end of the wire holding the Mylar strip pointing down.
7. Place electrical tape around the edges where the circle touches the rim of the jar, and place a thin band of cement around the wire where it punches through the cardboard.
8. After the rubber cement dries, crumple the aluminum foil into a tight ball, and carefully push it onto the top of the wire.
9. Rub the plastic comb or balloon against your hair or clothing (wool works best), and hold either one close to the aluminum foil ball.


Result :

If the air is dry enough, the ends of the Mylar strip fly apart when comb or balloon touches the ball.


Explanation :

An electroscope shows the attraction and repulsion of electrical charges. In all electrical activity, like charges repel and opposite charges attract. When you rub the comb, friction causes a positive charge to build up in the plastic. When you hold the positively charged comb near the aluminum foil ball, the comb attracts negative charges which move up through the wire so that only positive charges remain in the Mylar strip. Since both ends of the strip now have the sama charge, the ends of the strip flay apart.


Display Tip :

Display your electroscope along with an assortment of objects for creating static charges.

Source : Science Fair Projects by Glen Vecchione

Energy Conservation

The change in the kinetic energy of an object is equal to the net work done on the object

Work Energy Principle

In order to accomplish work on an object there must be a force exerted on the object and it must move in the direction of the force.

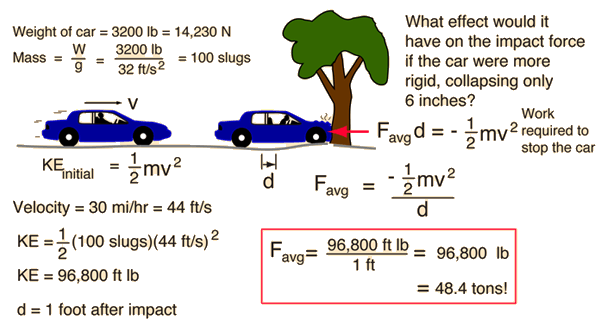
This fact is referred to as the Work-Energy Principle and is often a very useful tool in mechanics problem solving. It is derivable from conservation of energy and the application of the relationships for and energy, so it is not independent of the conservation laws. It is in fact a specific application of conservation of energy. However, there are so many mechanical problems which are solved efficiently by applying this principle that it merits separate attention as a working principle. For a straight-line collision, the net work done is equal to the average force of impact times the distance traveled during the impact.

Average impact force x distance traveled = change in kinetic energy

If a moving object is stopped by a collision, extending the stopping distance will reduce the average impact force.

Example of Force on Car


Source : http://hyperphysics.phy-astr.gsu.edu